Alert Actions
Alert actions are instructions to do something when an Alert is triggered (opened) or cleared (closed).
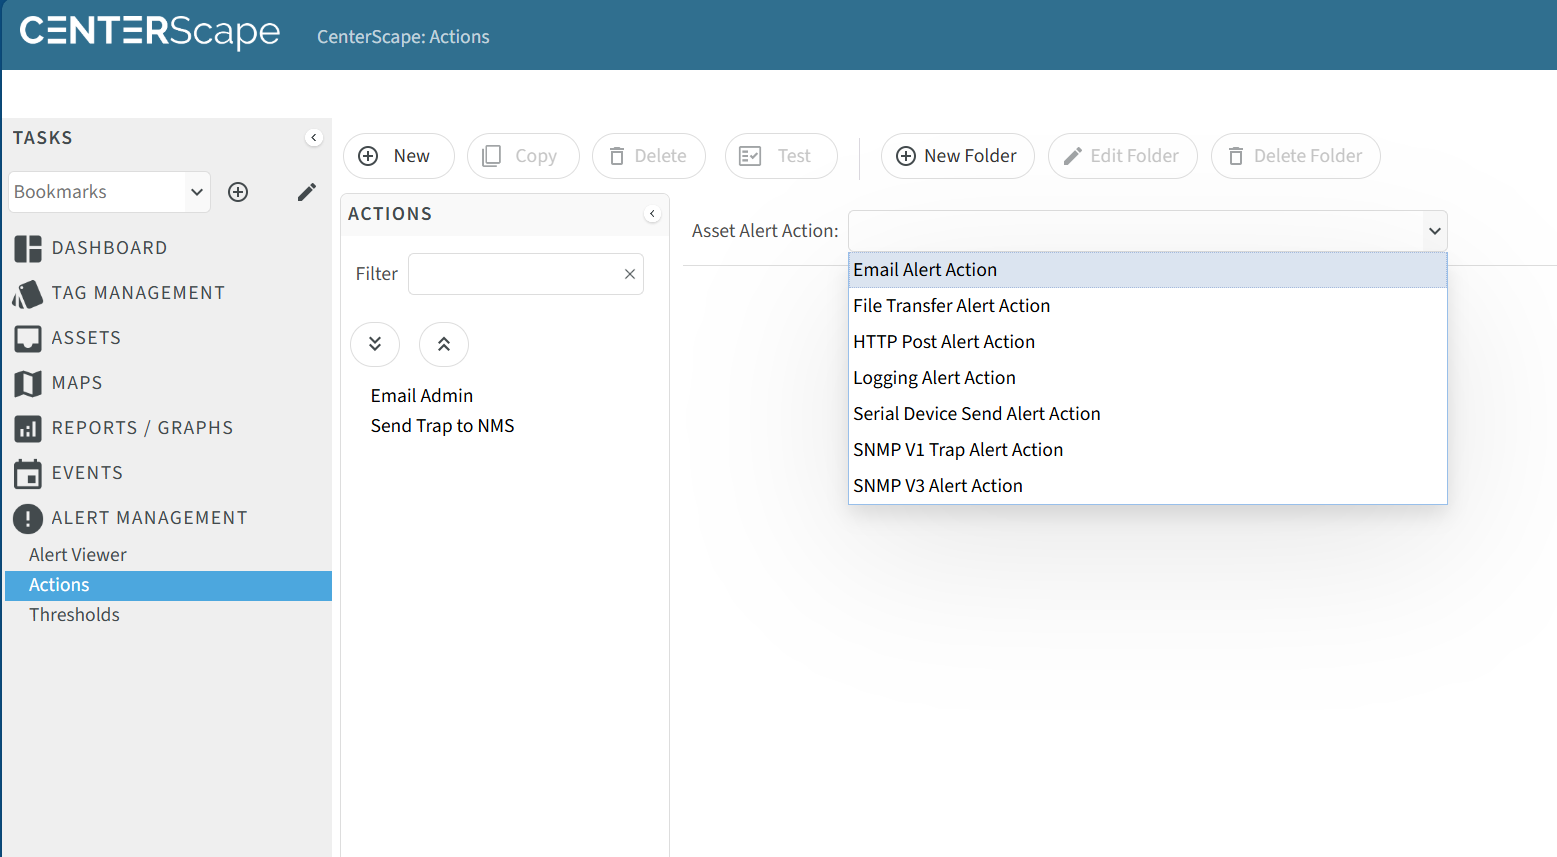
Alert actions can be the following:
- File Transfer
- HTTP Post
- Logging
- Serial Device Send
- SNMP V1 Trap
- SNMP V3 Trap
A threshold can be assigned an unbounded number of alert actions that will be executed simultaneously when alerts are opened and optionally again when they are closed.
Creating an Alert Action
Alert actions are created by navigating to User Console->Alert Management->Actions and selecting a new alert action from the drop down menu.
Common Alert Action Attributes
The following Alert Action Attributes are common across all alert actions.
| Attribute Name | Purpose | Recommendations |
|---|---|---|
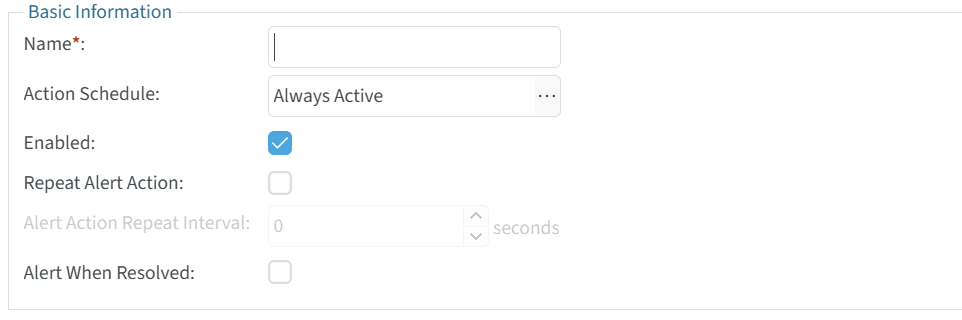
| Name | This needs to be a globally unique name of the Alert Action and is a required field. | The name of the Action should describe what it does. For example an email alert action that notifies the building management team of a Temperature problem at the Dallas data center coule be "Email Dallas BMS Team". |
| Action Schedule | This will enable or disbale the alert action based on a weekly schedule. | This can be used to manage email deliveries based on shift work. For example an after hours shift may check a different email address than a business hours shift. Having two or more email alert actions that follow shift work hours will cycle who gets notified base on the time of the Alert. |
| Enabled | Allows an alert action to be enabled or disabled. | An alert action can be disabled for many reasons including maintenance on the NMS, Email, or integrated software that uses HTTP Post. |
| Repeat Alert Action | Indicated whether an action should be repeated after initial execution if the Alert remains open. | It is recommened that this be used sparingly and only for the highest level failures. Many alerts take time to resolve. |
| Alert Action Repeat Interval | This is the interval that the execution of the alert action will be repeated on if Repeat Alert Action is set to enabled. | This value can be set to 3600 for a 1 hour interval which has been a reasonable amount of time for a critical alert to be cleared. |
| Alert When Resolved | Alert when resolved will exection the action on last time for an alert then the threshold clears and the alert transitions to the closed state. | Use of this function is recommended as a method to close the alert loop at least for email alert actions. For other action types the closure is depended on the level of integration on the NMS in the case of SNMP traps and custom integration in the case of HTTP posts. |
Email Alert Actions
Email alert actions are by far the most commonly used Alert Actions. An email alert action can have multiple emails separated by semicolon as the target so the actions can be used to maintain a list emails to target instead of a single email target. The email subject line and content can also be customized to provide information about the alert by using macros and text.
Email Address(es) - This is a list of one or more email addresses that the email alert action will deliver to. If mulitple email addresses are used a semicolon is used to separate email addresses. There is no hard limit to the number of email addresses but the field is limited to 4000 characters.
Email Subject Line - If this attribute is left blank the email subject line will be the following format:
- "Alert Started: Name of Asset that triggered Alert , Threshold: Name of Threshold"
- "Alert Resolved: Name of Asset that triggered Alert , Threshold: Name of Threshold"
The subject line can be customized to include other information if needed. The insert macro button can assist users in adding macro substitution to provide information about the alert dynamically.
Alert Action Message - This attribute dictates the content of the email. The default values for this attribute will output email content
Alert Source: BER Rack A01 Front Door Alert State: Open Alert Severity: Warning Alert Start Time: 2026-02-27 12:53:36.633-0600 Alert Resolve Time: Unresolved
Alert Description: A Door has been opened on a cabinet with door sensor: BER Rack A01 Front Door. Alert Value: Door: true
Additional Alert Source Information: Name: BER Rack A01 Front Door Asset Location: BER Rack A01 Description:
To view or manage the alert visit: https://[hostnameofCenterScape]:6581/t1-ui/user.html#view=user-alert-view
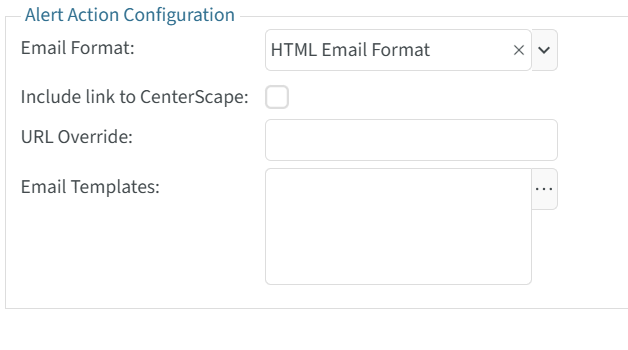
Email Format - The email format can be either plain text or HTML. If using HTML the Alert Action Message will not be included in the email. When selecting the HTML format three options are available.
- Include link to CenterScape - If enabled this will provide a link in the html email that will link to the CenterScape Alert UI
- URL Override - A substitute URL can be provided instead of the one generated by CenterScape.
- Email Templates - The Base email template is the default whether selected or not. RF Code has not yet expanded this feature for more than the default template. Contacting RF Code and expressing interest in the expansion of this feature is recommended if more templates are desired.
File Transfer Alert Action
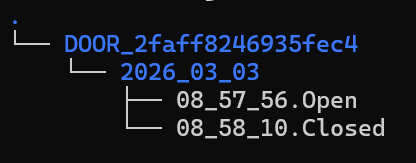
The file transfer alert action will send a file containing alert data to and ftp or sftp/ssh server. The action will create a directory structure in the relative directory of the user account on ftp or ssh/sftp directory presented upon login. The remote directory is based on macros that are configured in the alert action. The file name also is created using macro substitution. The default structure appears as the following:
The default Remote Directory and File Name settings are just suggestions. The fields are free form and a directory can be manually entered. For example instead of "${SOURCE_ID}/${DATE}" , the work "Alerts" could be used placing all alert files into a directory called "Alerts" instead of a dynamic one.
- Transfer Protocol - This can either be FTP or SFTP (SSH File Transfer). FTP is a very old protocol while SFTP (SSH File Transfer) adds encryption to the file transfer.
- Remote Directory - The remote directory is a directory used to write the files to. If the directory does not exist CenterScape will create it using the FTP or SSH protocol. The default is the id of the asset followed by the date of the alert.
- File Name - The file name of the file that contains the alert information will be named based on the Macros supplied. A file name must be unique so time is used as a default.
- Primary Host - This is the host that CenterScape will attempt to connect to via the chosen Transfer Protocol.
- Primary Port - This is the port that will be used to connect to the primary host. The default ports for both transfer protocols will be supplied but this port may need to be changed if running on a non standard port.
- Secondary Host - This optional field is a host that will be used if the primary host is unavailable or an error is encountered.
- Secondary Port - This is the port used for the secondary host.
- Username - The supplied to the transfer protocol
- Password/Confirm Password - The password for the account used in the transfer protocol.
- Additional Attributes - These are additional attributes of the source asset that can be supplied along with alert information.
The file will contain flat list of attribute value pairs. Below is an example of an output file.
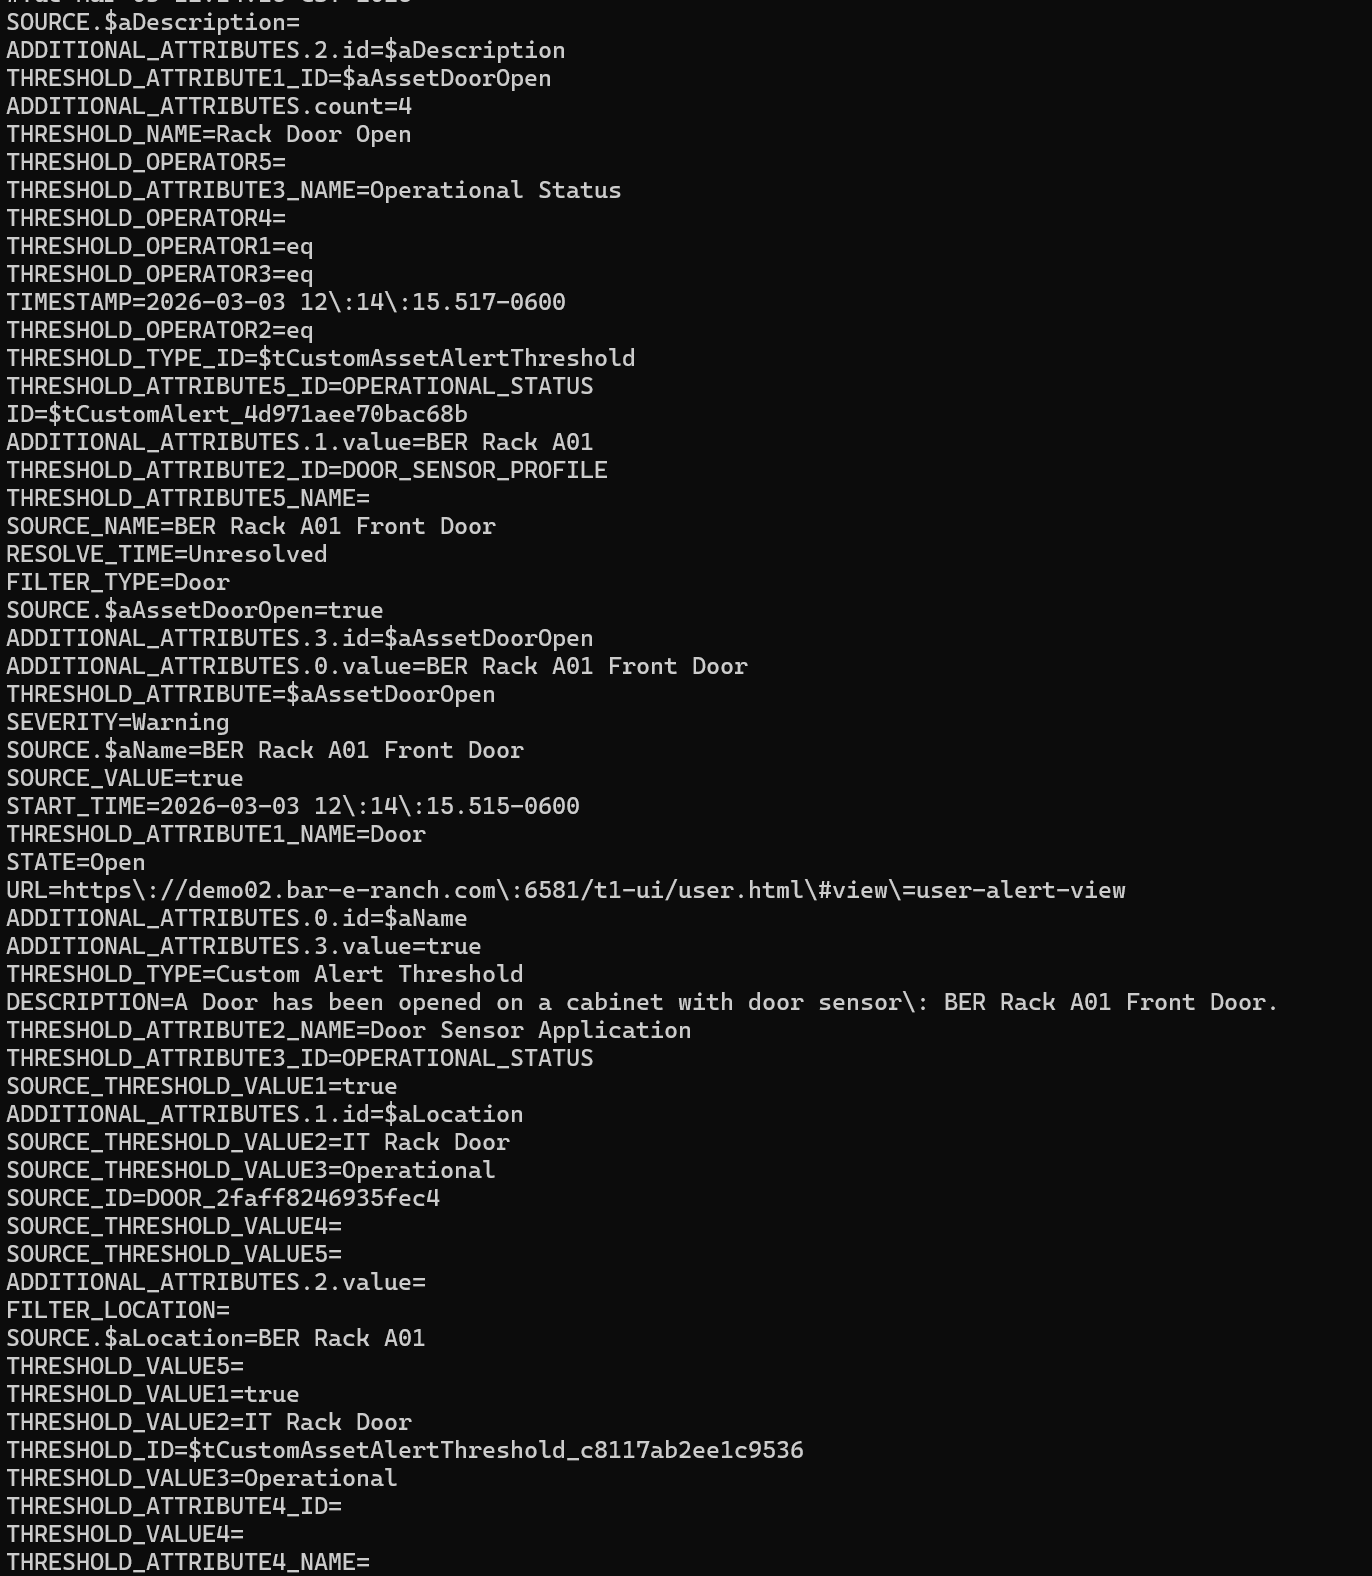
Additional attributes will follow a slightly different presentation. They will be provided in an array with both the id of the attribute and the value of the attribute.
ADDITIONAL_ATTRIBUTES.2.id=$aDescription
ADDITIONAL_ATTRIBUTES.count=4
ADDITIONAL_ATTRIBUTES.1.value=BER Rack A01
ADDITIONAL_ATTRIBUTES.3.id=$aAssetDoorOpen
ADDITIONAL_ATTRIBUTES.0.value=BER Rack A01 Front Door
ADDITIONAL_ATTRIBUTES.0.id=$aName
ADDITIONAL_ATTRIBUTES.3.value=true
ADDITIONAL_ATTRIBUTES.1.id=$aLocation
ADDITIONAL_ATTRIBUTES.2.value=
HTTP Post Alert Action
An HTTP post alert action transfers alert information via an HTTP Post method to a webserver setup to receive a post. The HTTP post will include a set of attribute value pairs that are determined by the configration of the alert threshold and the HTTP post alert action. The below example is the output of a python CGI script that prints out supplied data from an HTTP post.
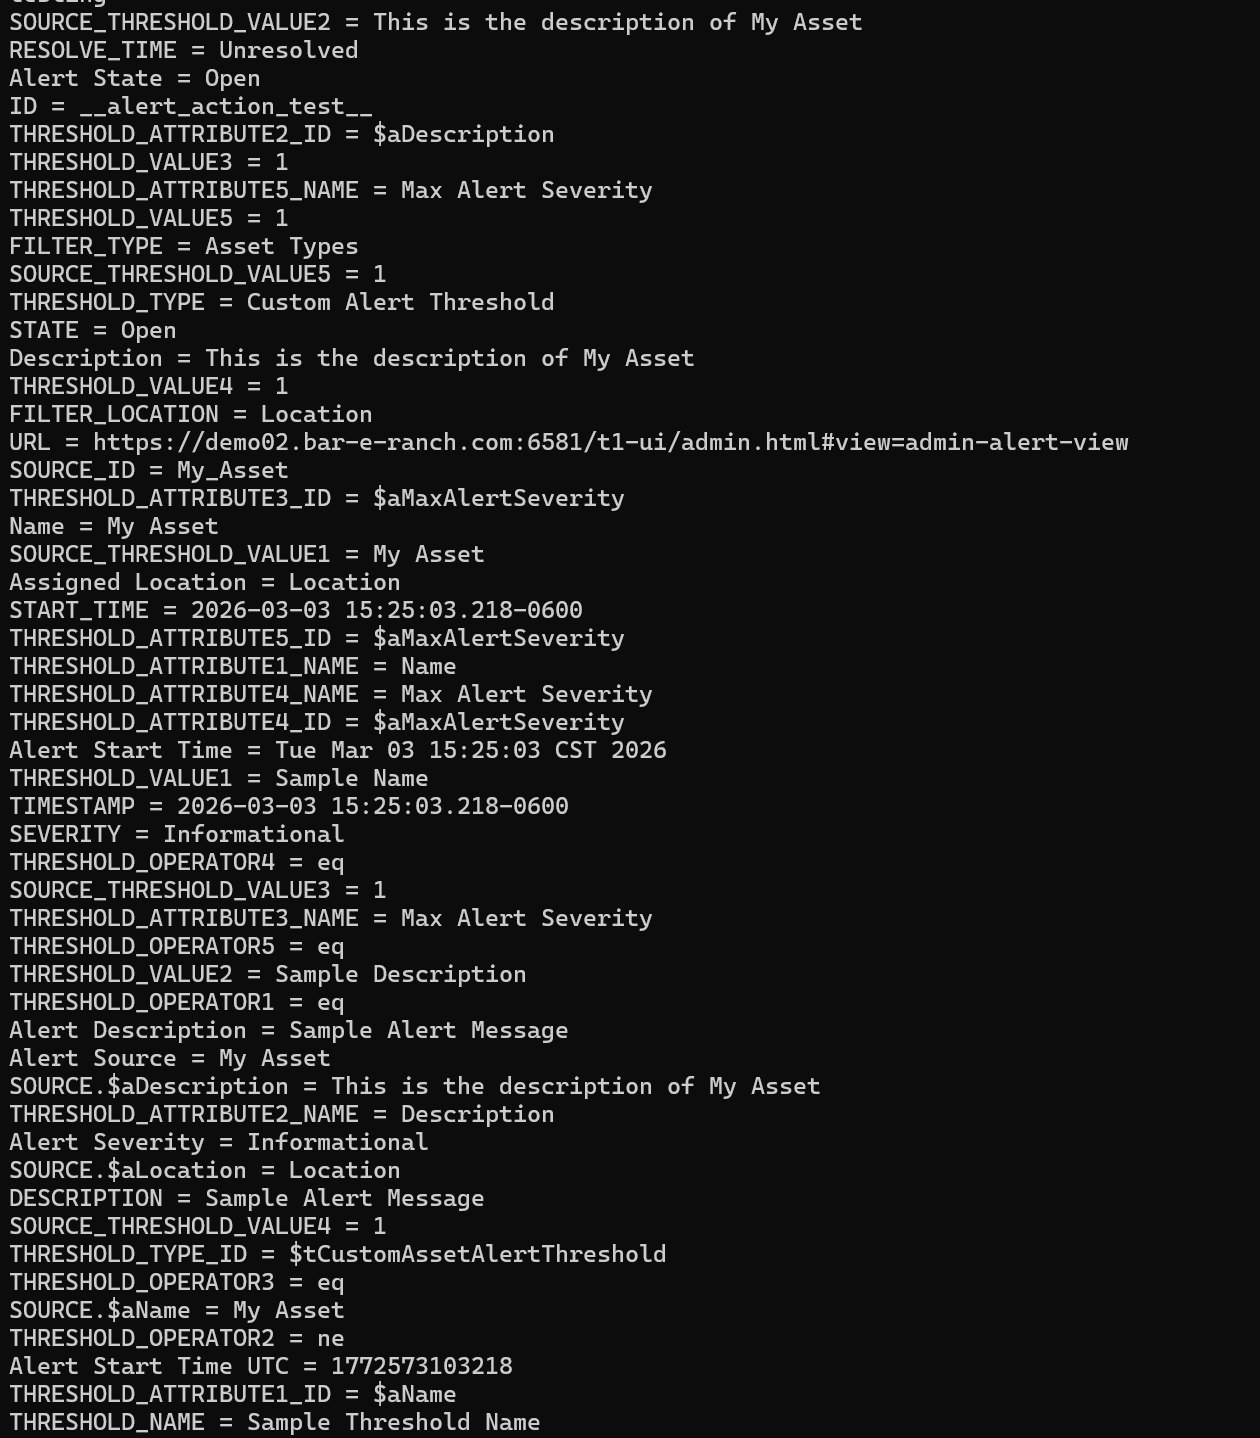
The very simple script that created the output file can be found Here. It is intended only as a rudimentary example of the data supplied by the post.
- Primary HTTP URL - This is the URL that CenterScape will attempt to post to. It does not need to to contain the http:// or https:// prefix, but if the webservice is not on the default port number of 80 for HTTP or 443 for HTTPS, then the port number should be supplied for example hostname:8081/cgi-bin/process .
- Secondary HTTP URL - This URL will be used if the first encounters an error. This is an optional attribute.
- SSL - This indicates whether to use SSL and how much verification should be used.
- HTTP Username - This user name will be provided using basic authentication.
- HTTP Password/Confirm Password - This is the password that will be provided with basic authentication. It is recommended that encryption be used.
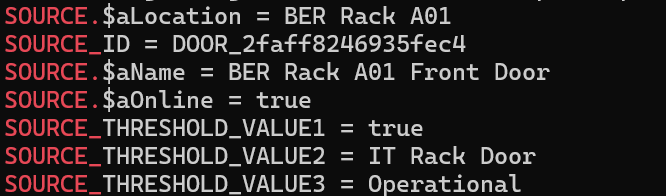
- Additional Attributes - This will add attributes to the HTTP post parameters from the asset that caused the alert.
Additional Attributes Will be enumerated with the source id prefix such as the following:
The intention of the post action is for custom integration so that loging can be implemented on the data provided by the post to open tickets or actuate predetermined actions based on the data provided by the alert.
Logging Alert Action
A logging alert action will append a new line containing information about an alert to a log file on the CenterScape Application host. This will be a single line of JSON or XML that contains an entire description of an alert and optional additional information on attribute values from the asset that caused the alert. The JSON Format example below if from a Door Alert Resolving.
{"TIMESTAMP":"2026-03-04 09:19:38.717-0600","DESCRIPTION":"A Door has been opened on a cabinet with door sensor: BER Rack A01 Front Door. ","ID":"$tCustomAlert_6f2cb7fed7cbb0e","RESOLVE_TIME":"Unresolved","SEVERITY":"Warning","SOURCE_ID":"DOOR_2faff8246935fec4","START_TIME":"2026-03-04 09:19:38.716-0600","STATE":"Open","THRESHOLD_NAME":"Rack Door Open","THRESHOLD_TYPE":"Custom Alert Threshold","THRESHOLD_ID":"$tCustomAssetAlertThreshold_c8117ab2ee1c9536","THRESHOLD_TYPE_ID":"$tCustomAssetAlertThreshold","URL":"https://demo02.bar-e-ranch.com:6581/t1-ui/user.html#view=user-alert-view","THRESHOLD_ATTRIBUTE1_ID":"$aAssetDoorOpen","THRESHOLD_ATTRIBUTE1_NAME":"Door","THRESHOLD_OPERATOR1":"eq","THRESHOLD_VALUE1":true,"SOURCE_THRESHOLD_VALUE1":true,"THRESHOLD_ATTRIBUTE2_ID":"DOOR_SENSOR_PROFILE","THRESHOLD_ATTRIBUTE2_NAME":"Door Sensor Application","THRESHOLD_OPERATOR2":"eq","THRESHOLD_VALUE2":"IT Rack Door","SOURCE_THRESHOLD_VALUE2":"IT Rack Door","FILTER_LOCATION":"","FILTER_TYPE":"Door","THRESHOLD_ATTRIBUTE3_ID":"OPERATIONAL_STATUS","THRESHOLD_ATTRIBUTE3_NAME":"Operational Status","THRESHOLD_OPERATOR3":"eq","THRESHOLD_VALUE3":"Operational","SOURCE_THRESHOLD_VALUE3":"Operational","THRESHOLD_ATTRIBUTE4_ID":"","THRESHOLD_ATTRIBUTE4_NAME":"","THRESHOLD_OPERATOR4":"","THRESHOLD_VALUE4":"","SOURCE_THRESHOLD_VALUE4":"","THRESHOLD_ATTRIBUTE5_ID":"OPERATIONAL_STATUS","THRESHOLD_ATTRIBUTE5_NAME":"","THRESHOLD_OPERATOR5":"","THRESHOLD_VALUE5":"","SOURCE_THRESHOLD_VALUE5":"","SOURCE.$aName":"BER Rack A01 Front Door","SOURCE.$aLocation":"BER Rack A01","SOURCE.$aDescription":""}
The same alert logging line in XML can be found Here.
Alert logging is designed for post-processing. It is not the same as syslog or application logging. Those logs can be found in the jetty/logs directory off installation directory of CenterScape. The default relative directory for Alert Logging is [CenterScape Install Dir]/jetty. It is recommended that a different directory be used than the default jetty directory. On CenterScape running on Windows, the system drive letter can be used in the log entry format.
 On Linux systems the directory can be specified off the root directory as in the below example.
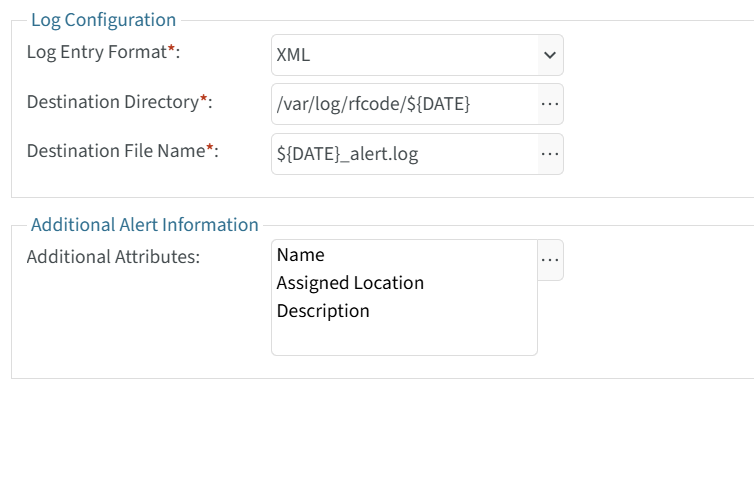
On both Windows and Linux systems the file system and directory used to write the log files to needs write access granted to the account that CenterScape runs under. This could be a service account or local system in Windows and the account referenced in the startup script on Linux.
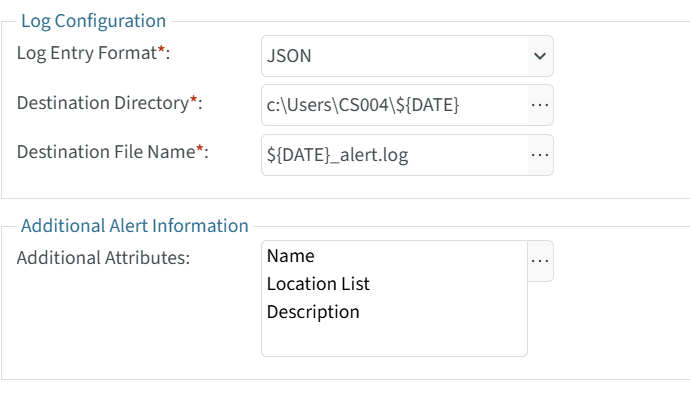
- Log Entry Format - This will determine how the attributes are formated in the single line of the log. Neither the JSON or XML will be in a particularly human readable format due to limiting EOL characters to on per alert action execution.
- Destination Directory - This is the directory that the log files will be places into. If the directory does not exist CenterScape will attempt the create it. On Windows if the directory does not begin with a drive letter than the path will be relative to [Install Directory]\jetty. Macros can be used to substitute values in the directory name, but are optional.
- Destination File Name - This is the name of the log. If a time macro is used then new logs may be generated daily or weekly. The default is daily.