MQTT
The Basics
Message Queue Telemetry Transport known more commonly as MQTT is a communications protocol designed for The Internet of Things (IoT) to communicate data via a publish and subscribe model. MQTT is designed so that many devices can individually send messages to a broker. An MQTT broker is a server that receives messages from these publishing devices and then routes the messages to the appropriate destination clients which are subscribers. The RF Code MQTT bridge is a separately installed software package that interfaces with the Zone Manager layer of RF Code software and then publishes sensor data to an MQTT Broker.
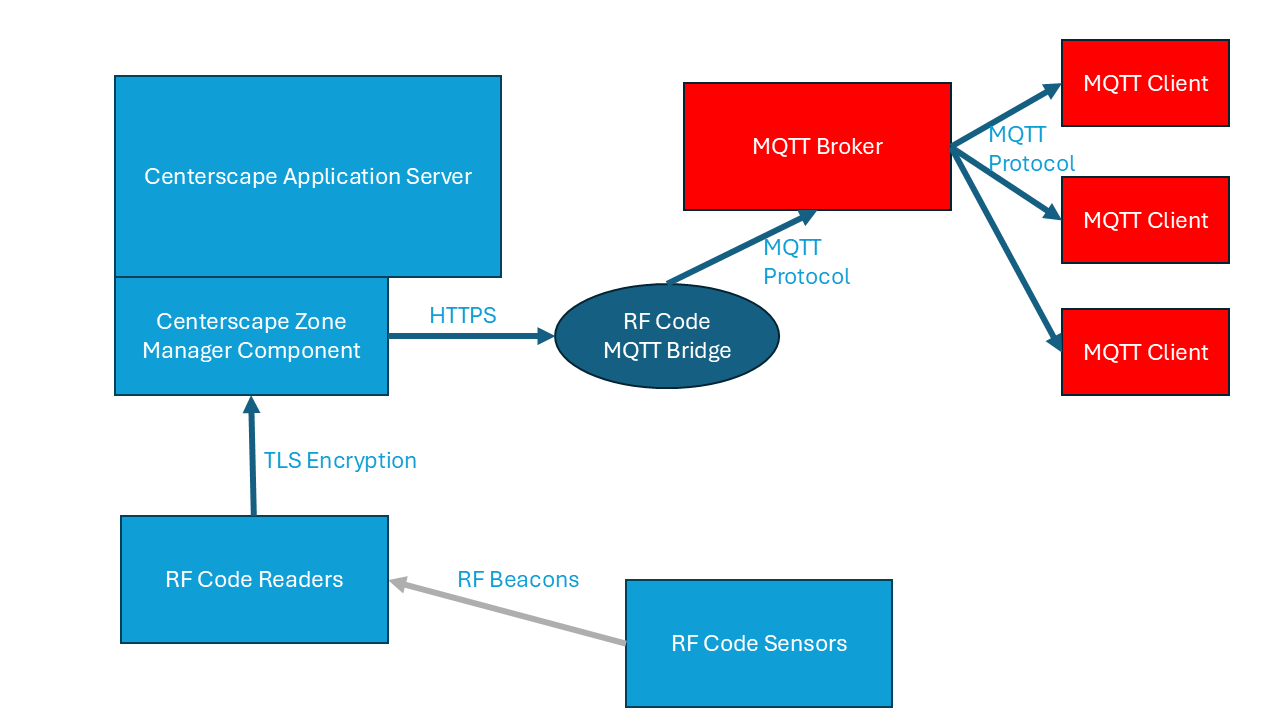
In the above graphic the light blue components are part of a standard CenterScape deployment. The dark blue MQTT bridge is added to interface with the MQTT broker. All components displayed in red are provided by third parties and supported by RF Code through the standards based MQTT protocol on the MQTT bridge. The RF Code MQTT Bridge can be installed on the same host as the CenterScape or if using multiple Zone Managers, on the same host as the Zone Manager. It can also be installed on any host that has network connectivity to both the MQTT Broker and Zone Manager.
MQTT Bridge Prerequisites and Software Specifications
The RF Code MQTT Bridge Software is a service that will run in Windows or Linux. The software is Java based and includes a distribution of the OpenJDK on each platform as part of its install. The RF Code MQTT Bridge will establish a connection to Zone Manager via HTTP or HTTPS and another connection to an MQTT broker using the MQTT protocol without encryption or over TLS. The service will get its configuration data from a conf file that will encrypt all passwords on the first run. There is no web server or user interface and all configuration options are included in the config file. In addition, a small database file used by an embedded database to store the topic structure.
The MQTT bridge software runs on the following platforms:
- Windows 2022 Server
- Linux: Red Hat 8 and 9 based 64-bit Linux distributions like Oracle, Rocky Linux, Fedora are supported. Other x64 Linux distributions like Ubuntu and Debian may work but are not tested by RFCode. Bugs reported by customers on non-Red Hat based distributions will be recreated only on Red Hat based distributions, however compatibility issues are extremely rare and generally JRE related.
- A read only account must be created on the Zone Manager that the MQTT Bridge will connect to and the MQTT Bridge must be able to connect to Zone Manager over HTTP or HTTPS from the host it is installed on.
- The MQTT Bridge software will need to be able to establish a TCP connection to the MQTT Broker. The MQTT broker must be functional and any authentication parameters for the MQTT broker must be know to connect the MQTT bridge.
MQTT Bridge Installation Windows
The steps for windows installation are as follows:
- Run the RF Code MQTT Bridge Installer. The installer will be called rfcode-mqttbridge-1.X-MQB_BUILD_DATE_P.exe where X would be the minor version of the software and BUILD_DATE would be the date the the MQTT bridge was built by RF Code engineering. The only option during the install is where to install the files to.
- After the install there will be a Service Called RF Code MQTTBridge in the Windows Services Manager. This service should be stopped before editing the MQTT config file.

- Copy the zonemgr_mqtt.properties.template file into the same directory.
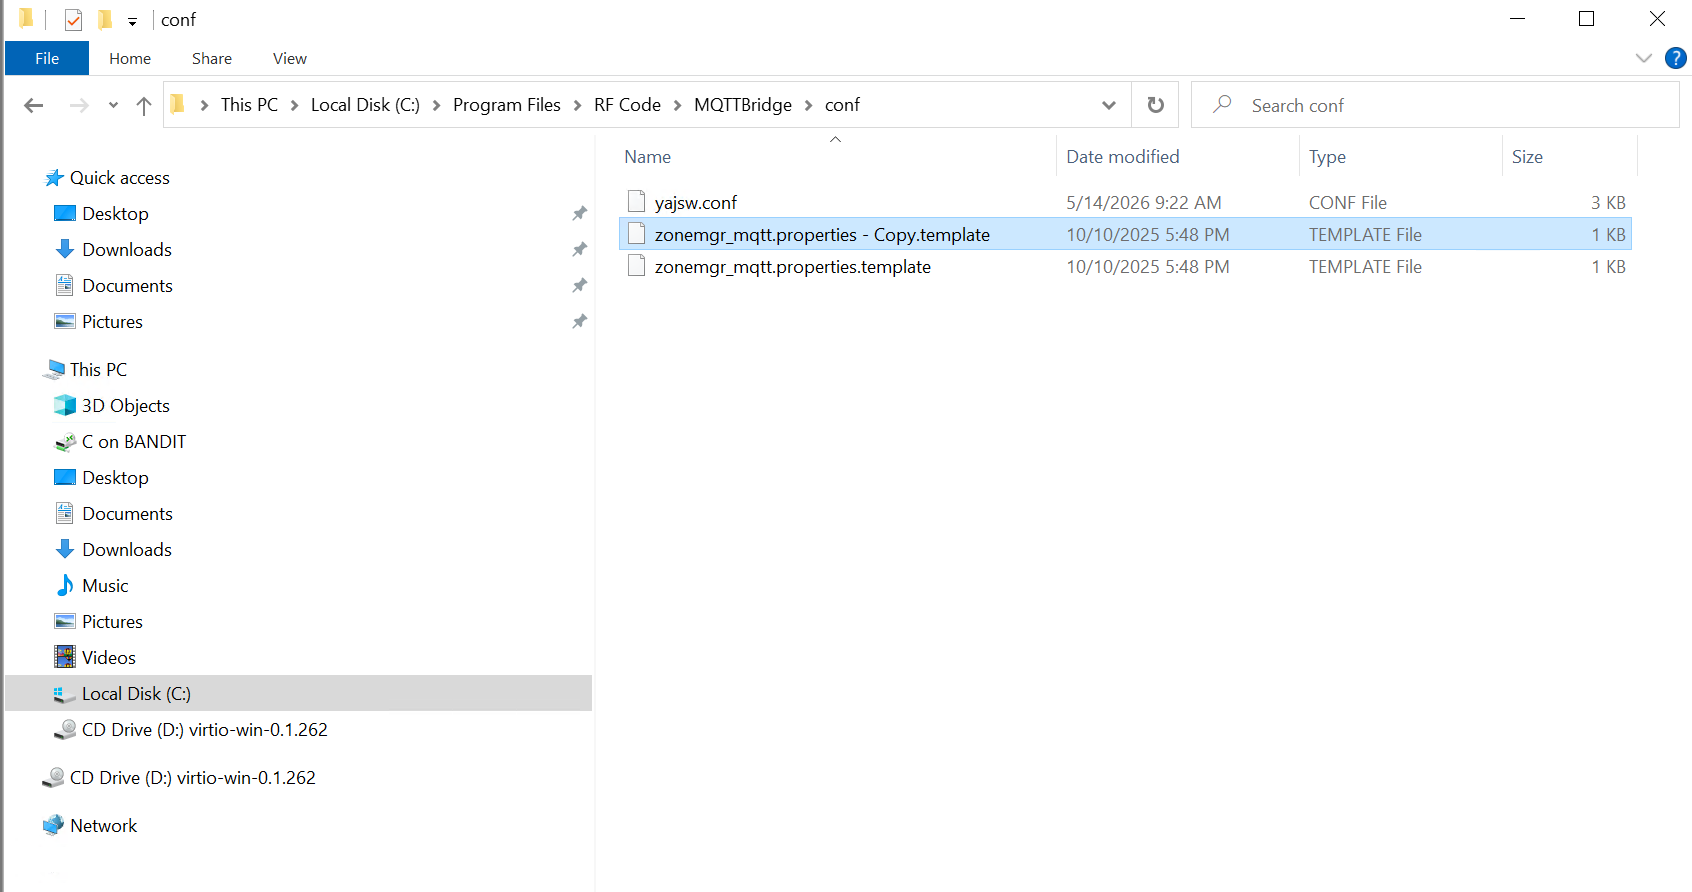
- Rename the copy as zonemgr_mqtt.properties.

- Edit the zonemgr_mqtt.properties as appropriate. Details are included later in this document.
- Start the RF Code MQTT Bridge Service. Logs can be found in <INSTALL DIR>\logs
MQTT Bridge Installation Linux
The linux installation of the MQTT bridge consists of extracting a compressed tar file, editing the configuration file, and updating the startup script. It does not require root level access but it does require to run as a user with read and write permissions to its install directory. The procedure to install the software is as follows.
- Create the directory that the software will be installed into. In this example the directory is /opt/rfcode/mqtt
#mkdir -p /opt/rfcode/mqtt
- Extract the software into the directory that was created. In this example the compressed software package is in /tmp.
tar -xvf /tmp/rfcode-mqttbridge-1.1-MQB_20260513_132148_P.tar.gz -C /opt/rfcode/testtar -xvf /tmp/rfcode-mqttbridge-1.1-MQB_20260513_132148_P.tar.gz -C /opt/rfcode/mqtt
- Edit the HOMEPATH variable in the rfcmqttbridge executable to the path that the MQTT software is installed in.

- In the rfcmqttbridge file a user named rfcode is assigned to run the bridge. The default user is RF Code but can be another user if desired. To change the edit the following line to a different user.

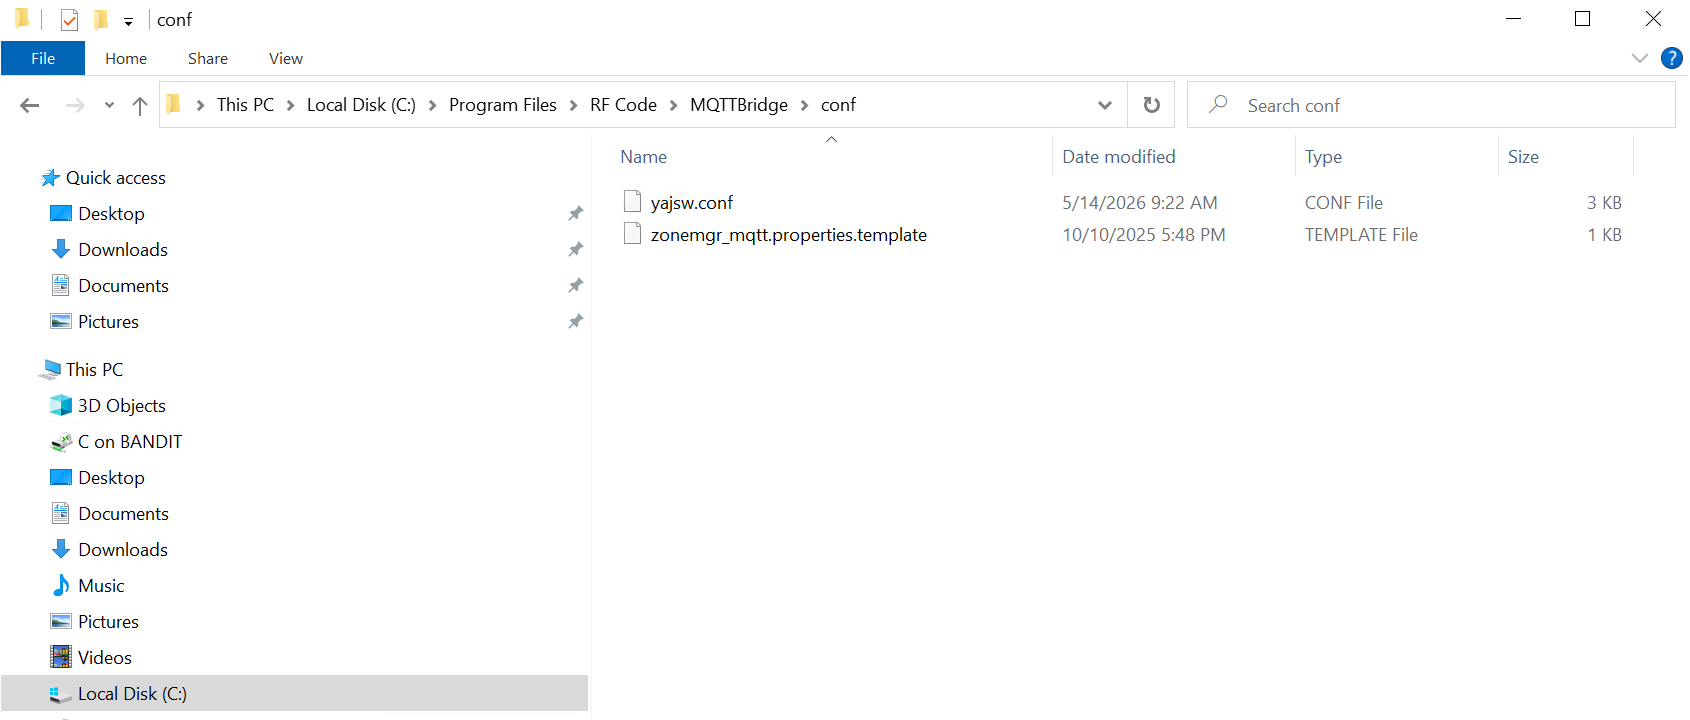
- In the conf directory there is a template for the configuration of the MQTT Bridge. Its name is zonemgr_mqtt.properties.template. This file should not be deleted but rather copied to the file zonemgr_mqtt.properties.

Note: The file that controls the configuration of the MQTT bridge is zonemgr_mqtt.properties and must be in the conf directory. The template file provides an example of the file structure and is NOT used by the software. 6. Change the ownership of the MQTT install directory to the user that will run the application. The default is rfcode. This user may have to be added if it does not already exist on the system. The sbin command "useradd rfcode" will add the user if needed.
chown -R rfcode:rfcode /opt/rfcode/mqtt6. Edit the zonemgr_mqtt.properties file as appropriate using the information contain later in this document. 7. Start the RF Code MQTT Bridge after the configuration.
rfcmqttbridge start8. The server can be stop, restarted or started with the following commands
rfcmqttbridge start
rfcmqttbridge stop
rfcmqttbridge restart
MQTT Configuration Parameters
| Parameter Name | Required | Purpose | Description & Use Case Notes |
|---|---|---|---|
| brokerProto | YES | Determines the communication type used for communication between the MQTT Bridge and the MQTT Broker | Valid values oar TCP for unencrypted MQTT traffic or SSL for TLS encrypted traffic |
| broderHostname | YES | The hostname or IP address of the MQTT Broker | This field can be a hostname or ip address. If using SSL for brokerProto the Broker must have a valid certificate that matches the hostname of the MQTT broker |
| brokerPort | YES | This is the port that the MQTT broker is set to listen to and will be used to connect from the MQTT bridge. | The default port for Standard MQTT is 1883 or 8883 for SSL/TLS encryption. If the port is non standard for the desired broker it is supplied here as well. |
| brokerUserID | NO | This is the username that is used to authenticate with the MQTT broker. | This parameter is required when the broker is setup for authentication and not required if authentication on the broker is not enabled. |
| brokerPassword | NO | The password used to authenticate with the MQTT broker. | This parameter is required when the broker is setup for authentication and not required if authentication on the broker is not enabled. The password is entered in the file in plain text but when the RF Code MQTT Bridge is ran with a plaintext password in this parameter it will encrypt the password and update the configuration file. The password is not accessible after the MQTT Bridge is ran so it must be kept safe elsewhere if needed in the future. |
| brokerPrefix | YES | This is the root level structure for topics sent from the RF Code MQTT Bridge to the MQTT Broker | The default for this is RFCode but can be changed to any valid topic structure value. |
| brokerVersion | YES | This is the Version of MQTT protocol for broker that is being connected to by the MQTT Bridge | Options are V3_1_1 and V5 is also an avaiable option). Check the broker for the required version. |
| brokerRetain | NO | Controls whether messages are sent as retained (true) or not (false - default) | This setting has raminifactions in the way the client gets data from RF Code. The default setting is false which means that when a client first connects to a broker it will only see a topic's existance if a new value from Centerscape/Zone Manager drives a value change. This means a MQTT Client will not know about the existence of a topic unless it is conencted to the broker durring an MQTT bridge restart or initialization. On a large system thousands of topics may not be updated with a value until a value in the system changes. Especially for asset tags, dry contact, door tags, and other tags with stable values this time period could be unlimited. It is recommended that the value be set to true if the MQTT client can process a mass amount of messages whenever the MQTT client's session is disconnected from the broker and reconnects. |
| brokerQos | YES | Quality of Service to use for published messages to broker (0=at most 1, 1=at least 1 (default), 2=exactly 1) | Notes about MQTT QOS standards: 0: Speed over reliability. 1: Reliable delivery with tolerable duplicates. 2: Absolute reliability with higher cost in performance. |
| brokerMaxInFlight | YES | Maximum number of unacknowledged publish messages (Qos=1 or 2) before client will delay further sending. | Default is 10, but high traffic or high latency environments might benefit from a higher value. |
| clientID | YES | MQTT client ID of the client (default RFCodeMQTTBridge). IMPORTANT: this needs to be unique to a given MQTT broker | If two clients have the same ID, they will replace one another as the second connection will bump the first one. A recommended naming convention would be site based, or based name of the host that is running the Zone manager Software or the RF Code MQTT Bridge. |
| zoneMgrHostname | YES | This hostname or IP Address of the instance of Zone Manager that the RFCode MQTT Bridge will connect to. | For installs where the RF Code MQTT bridge is on the same host as the Zone Manager Instance, use 127.0.0.1 or localhost. |
| zoneMgrPort | YES | This is the port number for Zone Manager HTTP/HTTPS API | Default ports for Zone Manager are 6580 for HTTP and 6581 for HTTPS but these ports can be configured to other ports by the CenterScape/Zone Manager application administrator. |
| zoneMgrUserID | YES | This is the User ID to be used to communicate with Zone Manager. | When using a Zone Manager within a CenterScape application, this should be the read only user account configured in the "Zone Managers" slection in the Administrative Console under Configuration. |
| zoneMgrPassword | YES | Password to be used to communicate with Zone Manager. | The plain text value of the password will be rewritten with an encrypted value when first read by agent. The password should be stored elsewhere if a record of it is needed. |
| zoneMgrProto | YES | Protocol for API to Zone manager (http or https) | |
| tagGroupCodeFilter | NO | If defined and not empty, list of specific tag group codes to limit reporting tags to (will cause any tags from the ZM with different group codes to be ignored). | If configured a format example would be tagGroupCodeFilter=TMPRCK,RMHUMA,RFCRCK |
| zoneMgrRefreshDelay | YES | If defined, provides number of seconds of delay (0 or more) between refresh calls to Zone Manager. Increasing this can marginally reduce load on the server, but at the expense of the timeliness of the reporting of new data. Default is 1. | Setting to 0 from the default of 1 can lower response time by up to 1/2 a second, but will increase network requests and traffic. |
| tagLocationFilter | NO | If defined and not empty, list of specific location IDs to limit reporting tags to (will cause any tags not in/under one of these locations to be not added or kept offline if already added). "" can be used to include tags with unknown locations. | The Location filter operates on the equivelent of the CenterScape Detected Location field. This means that the filter operates based on the current detected location of a tag as it is resolved by Zone Manager rules. It is recommended that the expected location be used instead if the purpose is to filter by Assigned Location in CenterScape. |
| tagExpLocationFilter | NO | If defined and not empty, list of specific expected location IDs to limit reporting tags to (will cause any tags not expected to be in/under one of these locations to be not added or kept offline if already added). "" can be used to include tags with unknown expected locations. | This filter is equivelent to assigned location in CenterScape and should be used to seperate sensors based on geopraphic locations among multiple RF Code MQTT bridges. |
| onlyAssetBoundTags | NO | If defined and true, limits tags reported and monitored to those associated with an asset (that is, provisioned within CenterScape). Otherwise, all detected tags are reported (which is likely appropriate for standalone Zone Manager deployments). | Recommended for use when the CenterScape is used. |
| topicFilter | NO | - if defined and not empty, this limits which topics should be reported (which can be useful way to not expose data that is not of interest, or to split such data across different agents). Topic names include: "TagGroupCode", "Location", "ReaderStatus", "BaseTag", "TempTag", "HumidTag", "FluidTag", "DoorTag", "PDUTag", "DryContactTag", "TempTagByLoc", "HumidTagByLoc", "FluidTagByLoc", "DoorTagByLoc", "DryContactTagByLoc", "PDUTagByLoc", "DiffPressTag", "DiffPressTagByLoc", "PDUTagPhase", "PDUTagByLocPhase", "PDUTagOutlet", "PDUTagOutlet", "PDUTagByLocOutlet", "PDUTagByLocOutlet", “MergedTag” | Disabling some topics (e.g. Locations) might make data unavailable that otherwise would be referred to by other topics (the details of a location referred to by various tag topics) |
The following is a working example of a working zonemgr_mqtt.properties file.
#Fri May 08 15:22:48 CDT 2026
brokerPort=1883
clientID=mqtt-01
tagExpLocationFilter=
brokerProto=tcp
zoneMgrRefreshDelay=1
retryBrokerErrors=false
caFile=
keyPassword=$rizobf$1$iMt4aJJgfd9QT4=$NuvihOo1ggfB7loDZptl31BmQ==
zoneMgrPassword=$rizobf$1$Jm0/L97gfgxJw=$n5QJgX2VL1Yi7mVbxEhnGw==
tagGroupCodeFilter=
tagLocationFilter=
brokerQos=1
zoneMgrProto=http
brokerHostname=mqtt-broker.bar-e-ranch.com
brokerPassword=$rizobf$1$yhNCdgg0+wDo=$R3C+32P813TVadfYxjpx9DA==
keyFile=
brokerRetain=true
brokerMaxInflight=20
onlyAssetBoundTags=true
brokerUserID=
brokerPrefix=rfcode
zoneMgrUserID=rfcode
brokerVersion=V5
zoneMgrPort=6580
zoneMgrHostname=stoic.bar-e-ranch.com
certFile=
topicFilter=
Verifying Functionality
To Verify the functionality of the RF Code MQTT Bridge an MQTT Client should be connected to the broker that the bridge is assigned to. The broker should publish the sensor data from the RF Code Bridge.
Using the software MQTT-Explorer by Thomas Nordquist which can be found at https://mqtt-explorer.com/ , the MQTT Client is pointed at the broker and CenterScape sensor data that reaches the broker from the RF Code MQTT Bridge is published to the MQTT-Explorer Client.
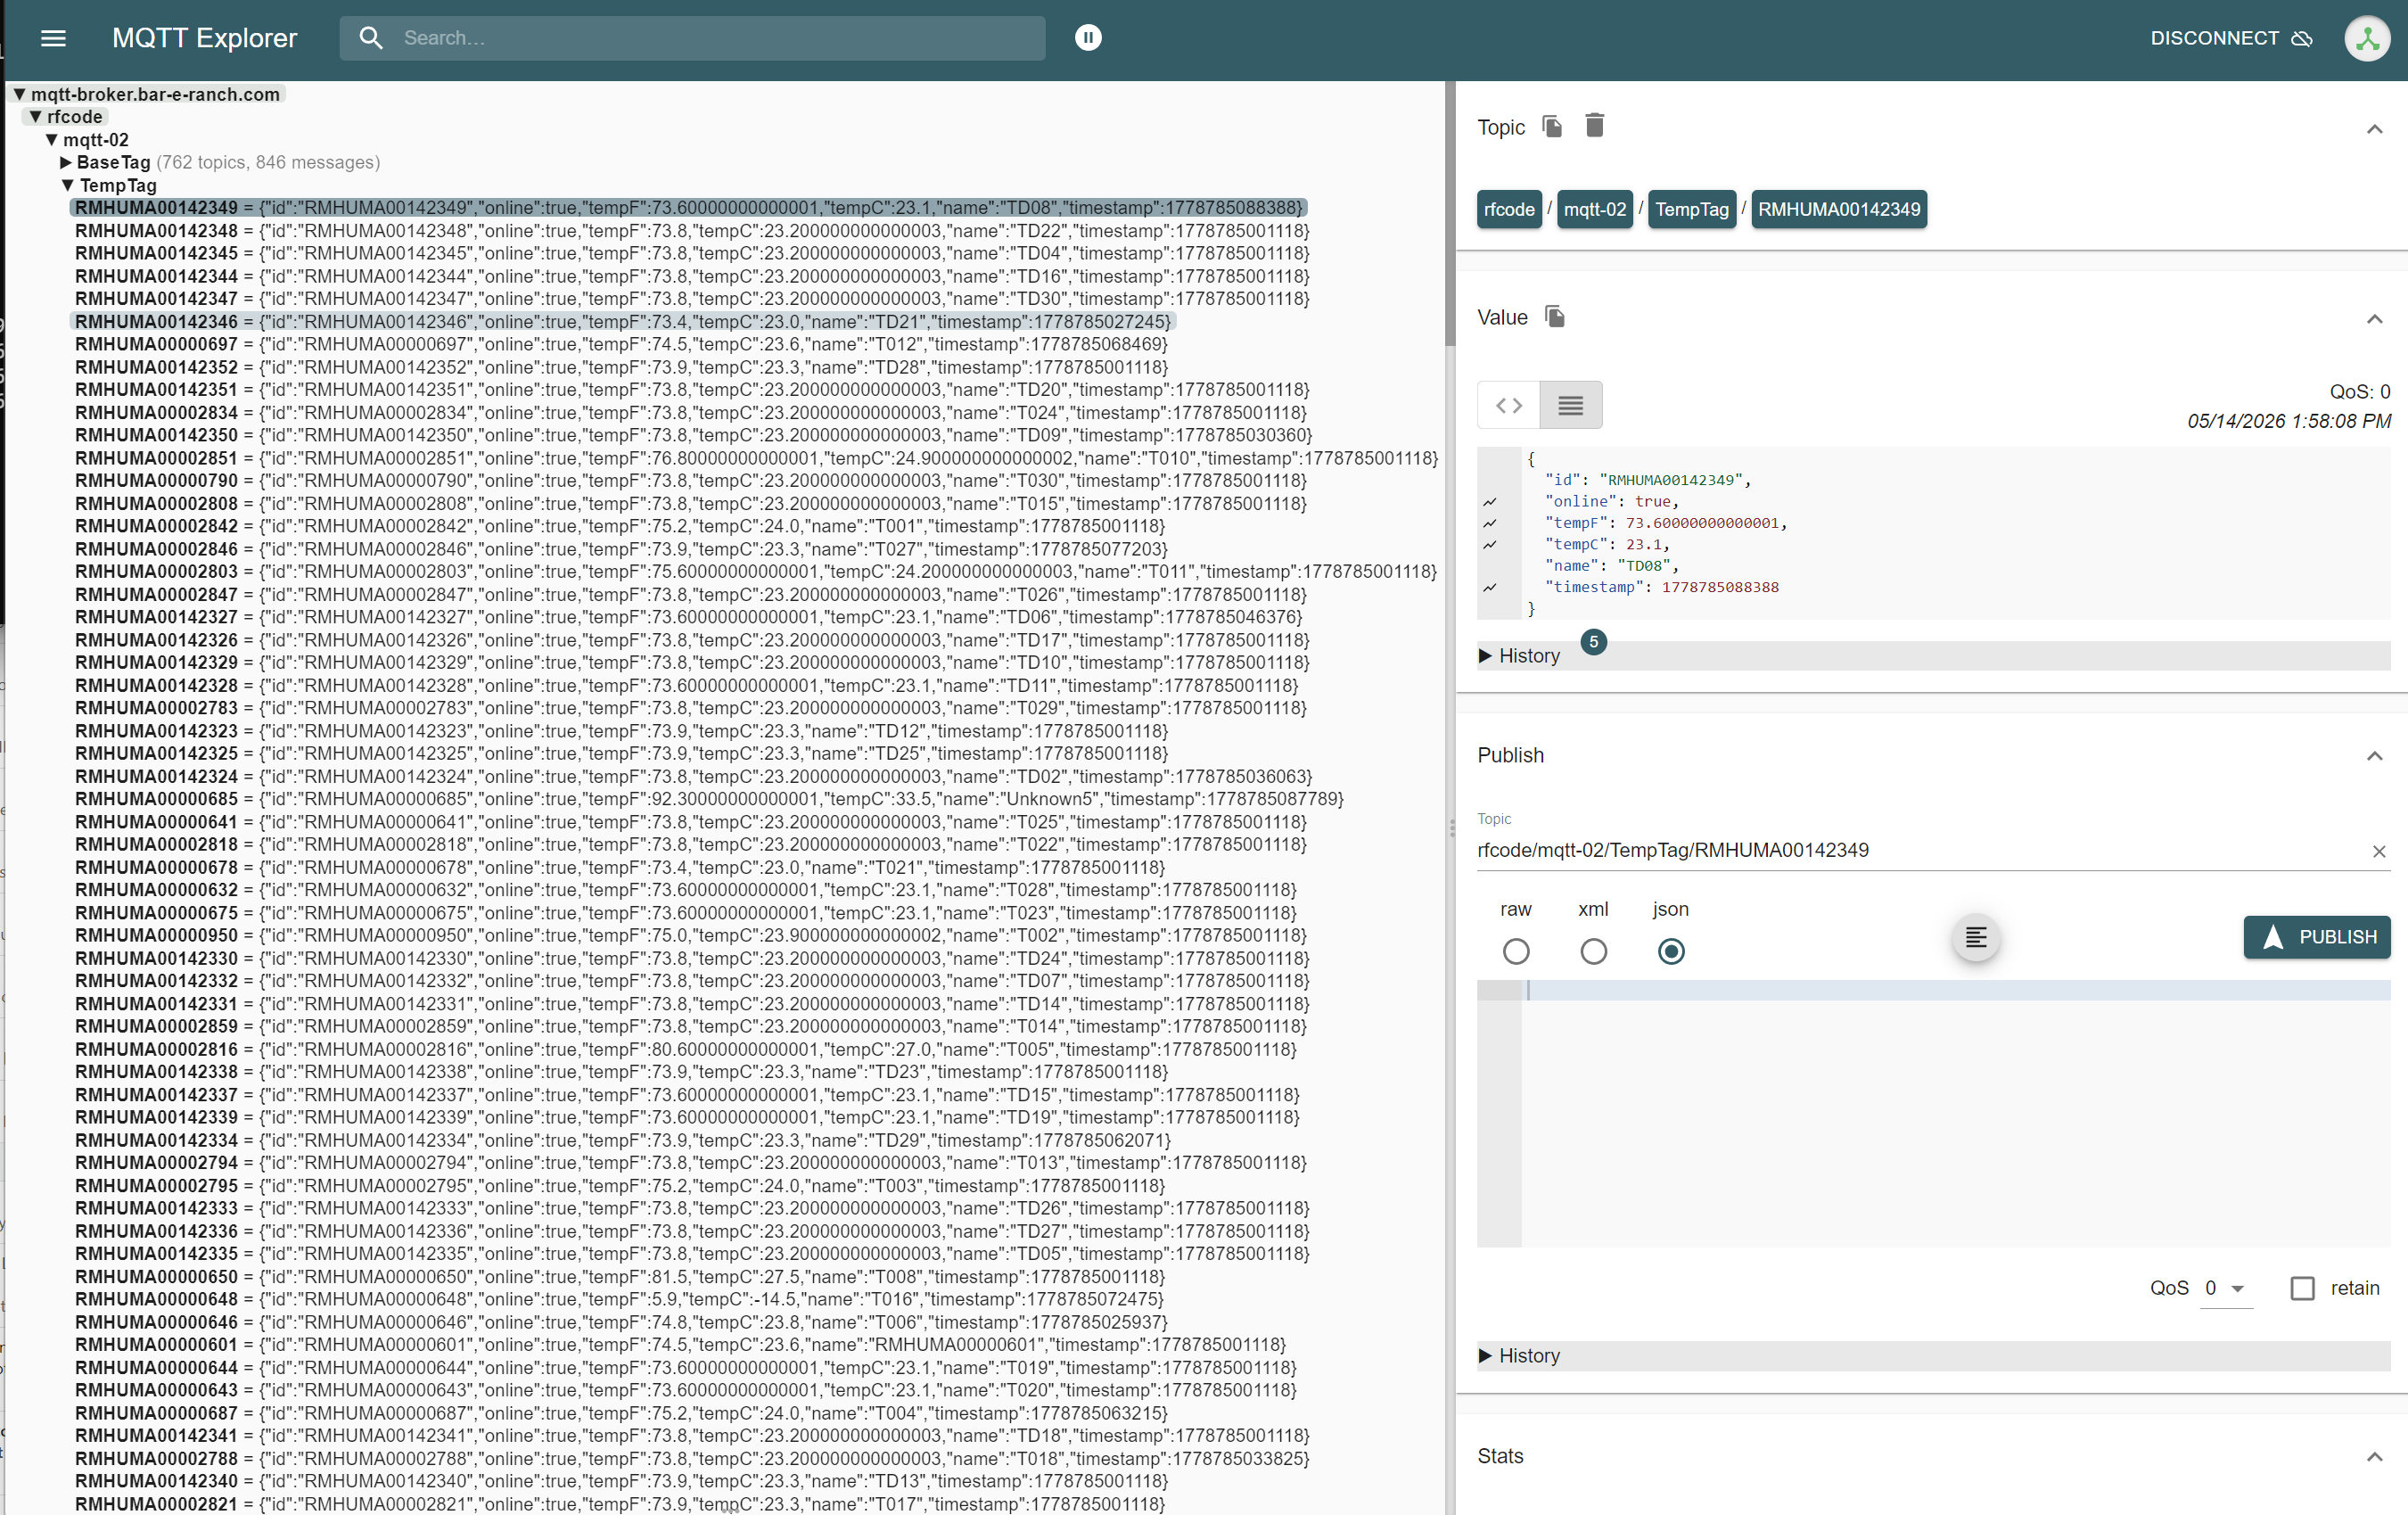
The topics are enumerated in the structure (Broker Name)->(Broker Prefix)->(Client ID)->(Topic Name)
A Temperature Sensor in the TempTag Topic is shown as the following
{
"id": "RMHUMA00142349",
"online": true,
"tempF": 73.8,
"tempC": 23.200000000000003,
"name": "TD08",
"timestamp": 1778787061799
}
Additional Schema Information
A more detailed description of the schema is available from the following document.
Obtaining the RF Code MQTT Bridge
Contact RF Code Support and let us know if you want the Windows or Linux version of the RF Code MQTT Bridge to obtain a download link.